What's In This Post
If you’re looking to make your own bonnet but don’t have time to gather all the materials, you may be wondering if you can make a bonnet with the limited materials you have lying at home.
In this post, we will go over some DIY ways to create bonnets including without elastic, with a scarf, or with a shirt.
Contents
How to Make a Bonnet Without Elastic
You can make a bonnet without elastic by substituting the elastic with a ribbon. You will need to leave a small opening at the back of your bonnet for tightening and tying the ribbon in order to have a snug fit.
The tutorial below assumes you have some sewing knowledge or are familiar with the use of a sewing machine.
Here’s what you need:
- A pair of scissors
- Pins and Safety Pins
- Ribbon
- Needle and thread or sewing machine
- Marker (e.g Tailor’s chalk)
- 2 pieces of fabric (Recommend using satin or silk, at least 30″ W by 30 “L)
- 1 large piece of paper (at least 15″ W by 15″ L)
- Ruler
Step 1 – Create a Template
a) Lay the paper flat on top of a table. Near the bottom left corner of the paper, mark an “X” and measure 13″ in a straight line along the bottom edge of the paper. Mark a dot at the 13″ point.
b) To create the arch, keep the “0” mark of your ruler on the “X” and angle your ruler upwards around 5 degrees from the line you have drawn. Make a dot at 13″.
c) Move your rule up another 5 degrees while keeping the “0” mark of your ruler on the “X”. Make another dot at 13″. Continue this process until your ruler reaches the vertical position. The result should look similar to the orange area marked out in the diagram below:
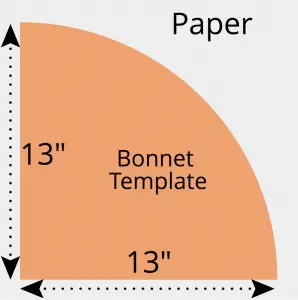 Your template should look like a quarter circle with two 13″ straight sides and dots marked along the arch. Cut out this template and put it aside for now.
Step 2 – Fold the Fabric
Fold the 2 pieces of fabric in half and then in half again. You should end up with a square of about 15″ by 15″
Step 3 – Pin The Template to The Fabric & Cut the Arch
a) Lay the folded fabric flat on the table so that the closed corner is positioned on the bottom left. Lay your template on top of the fabric and align the 90-degree corner (i.e, the one without the arch) to the corner of the fabric. The straight edges of the template should align with the left and bottom edges of the fabric.
b) Use pins to pin the template to the fabric and then cut along the arch.
c) Unfold the fabric and you should have a circle with a 26″ radius.
d) Repeat steps a to c with the 2nd piece of fabric.
Step 4: – Sew Front and Back Pieces Together
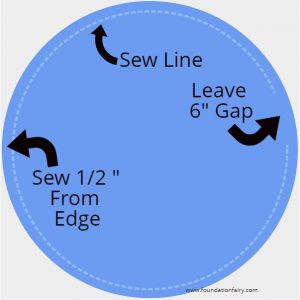
a) Sew the 2 pieces of fabric together with the 2 unwanted sides facing each other. Sew all the way around about 1/2″ from the edge of the fabric. Leave a 6″ gap opening.
 b) Using the 6″ gap opening, turn the bonnet inside out.
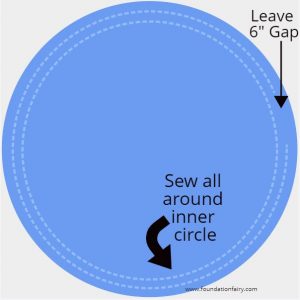
c) Using the tailor chalk, mark out a circle that is 1-1/2″ from the edge of the bonnet (top side).
d) Using the tailor chalk, mark out another circle that is 1/2″ from the edge of the first circle to the edge of the fabric.
e) Sew all the way around the inner circle
f) Sew around the outer circle but leave out the same 6″ gap created in step a.
Step 5 – Prepare and Insert Ribbon
a) Take a ribbon and measure your ribbon around your head where you want your bonnet to sit. Add 12″ to this and cut out the ribbon.
b) Tie one end of the ribbon to a safety pin feed it through the “channel” that you have created with the 2 circles. The channel is the gap between the 2 circles. You should end up with 1 end of the ribbon on 1 opening of the channel and the other end of the ribbon on the other end.
c ) Tie a knot at the ends of your ribbon so that one side won’t accidentally get pulled through into the channel.
There you have it! A bonnet without elastic!
To use your bonnet, simply place on over your head, pull on each end of the ribbon to tighten it, and then tie the ends together.
How to Make a Bonnet Out Of a Scarf
You can make a bonnet out of a scarf by first tying up your hair and then wrapping the scarf around your head for a “bonnet” look. This approach is easiest and you wouldn’t need to cut or sew your scarf.
Note that most scarfs don’t have enough fabric to make a bonnet so this method is a great alternative for making a hair bonnet without sewing or hot glue
I recommend using a silk, cotton, or polyester scarf. Make sure the scarf is big enough to wrap around your head twice. Cotton and polyester give more structure to the bonnet, while silk may be more comfortable.
Step 1: Tie Up Your Hair
If you have long hair, tie it into a high bun on the top of your head. Twist and gather your hair at the top of your head and secure it with bobby pins. If you have short hair, pin a piece of folded cloth wrapped around your hair to help hold it in place.
Step 2: Wrap Your Scarf On Your Head
a) Wrap your scarf around the back of your head. Use your palms to gather either end of the scarf and cross the lengths of the scarf over each other over the front of your head. Apply gentle tension to have a snug fit.
b) Bring the 2 ends of the scarf towards the back of your head and tie a knot at the back.
Step 3: Tuck in the Ends
Bring the ends back towards the front of the head and tuck them into the scarf to secure the ends. Alternatively, you can tie the ends behind your neck, letting the spare ends hang down.
How to Make a Hair Bonnet Out Of a Shirt
You can make a hair bonnet out of a shirt by either cutting up the shirt to utilize its fabric or wrapping your hair with it to create a “bonnet” look.
If you want to cut up the shirt to use its fabric, ensure that you find a shirt that is big enough to cover your head and hair. Most shirts only have enough usable fabric to create a bonnet for people with smaller heads. If you decide to try this route, Follow my tutorial above for creating a bonnet without elastic. You will need to cut up the shirt to remove the sleeves, collar and into 2 large squares of fabric. You can use an elastic if you don’t want to use a ribbon.
If you want to wrap your head with the shirt to create a “bonnet” look, grab two opposite ends of your shirt, fold it in half and then wrap it around your head similar to the method I’ve provided above for a scarf. Follow my instructions on how to make a bonnet out of a scarf for more information.
If you want to learn more about head wrapping and hair plopping, check out my guide on how to plop hair.